diy

Custom Valentines on Etsy

I have had so much fun creating valentines for my kids’ elementary school Valentine’s Day parties. Every year I expect them to ask for cartoon-branded, big box store valentines and every year they surprise me by wanting something custom-made by their mom.

I have made three of these valentines available for purchase in my Etsy shop. See below for instructions on how to order. This post contains a few affiliate links. Shopping through these links earns me a few cents and it’s greatly appreciated to keep my little business running.

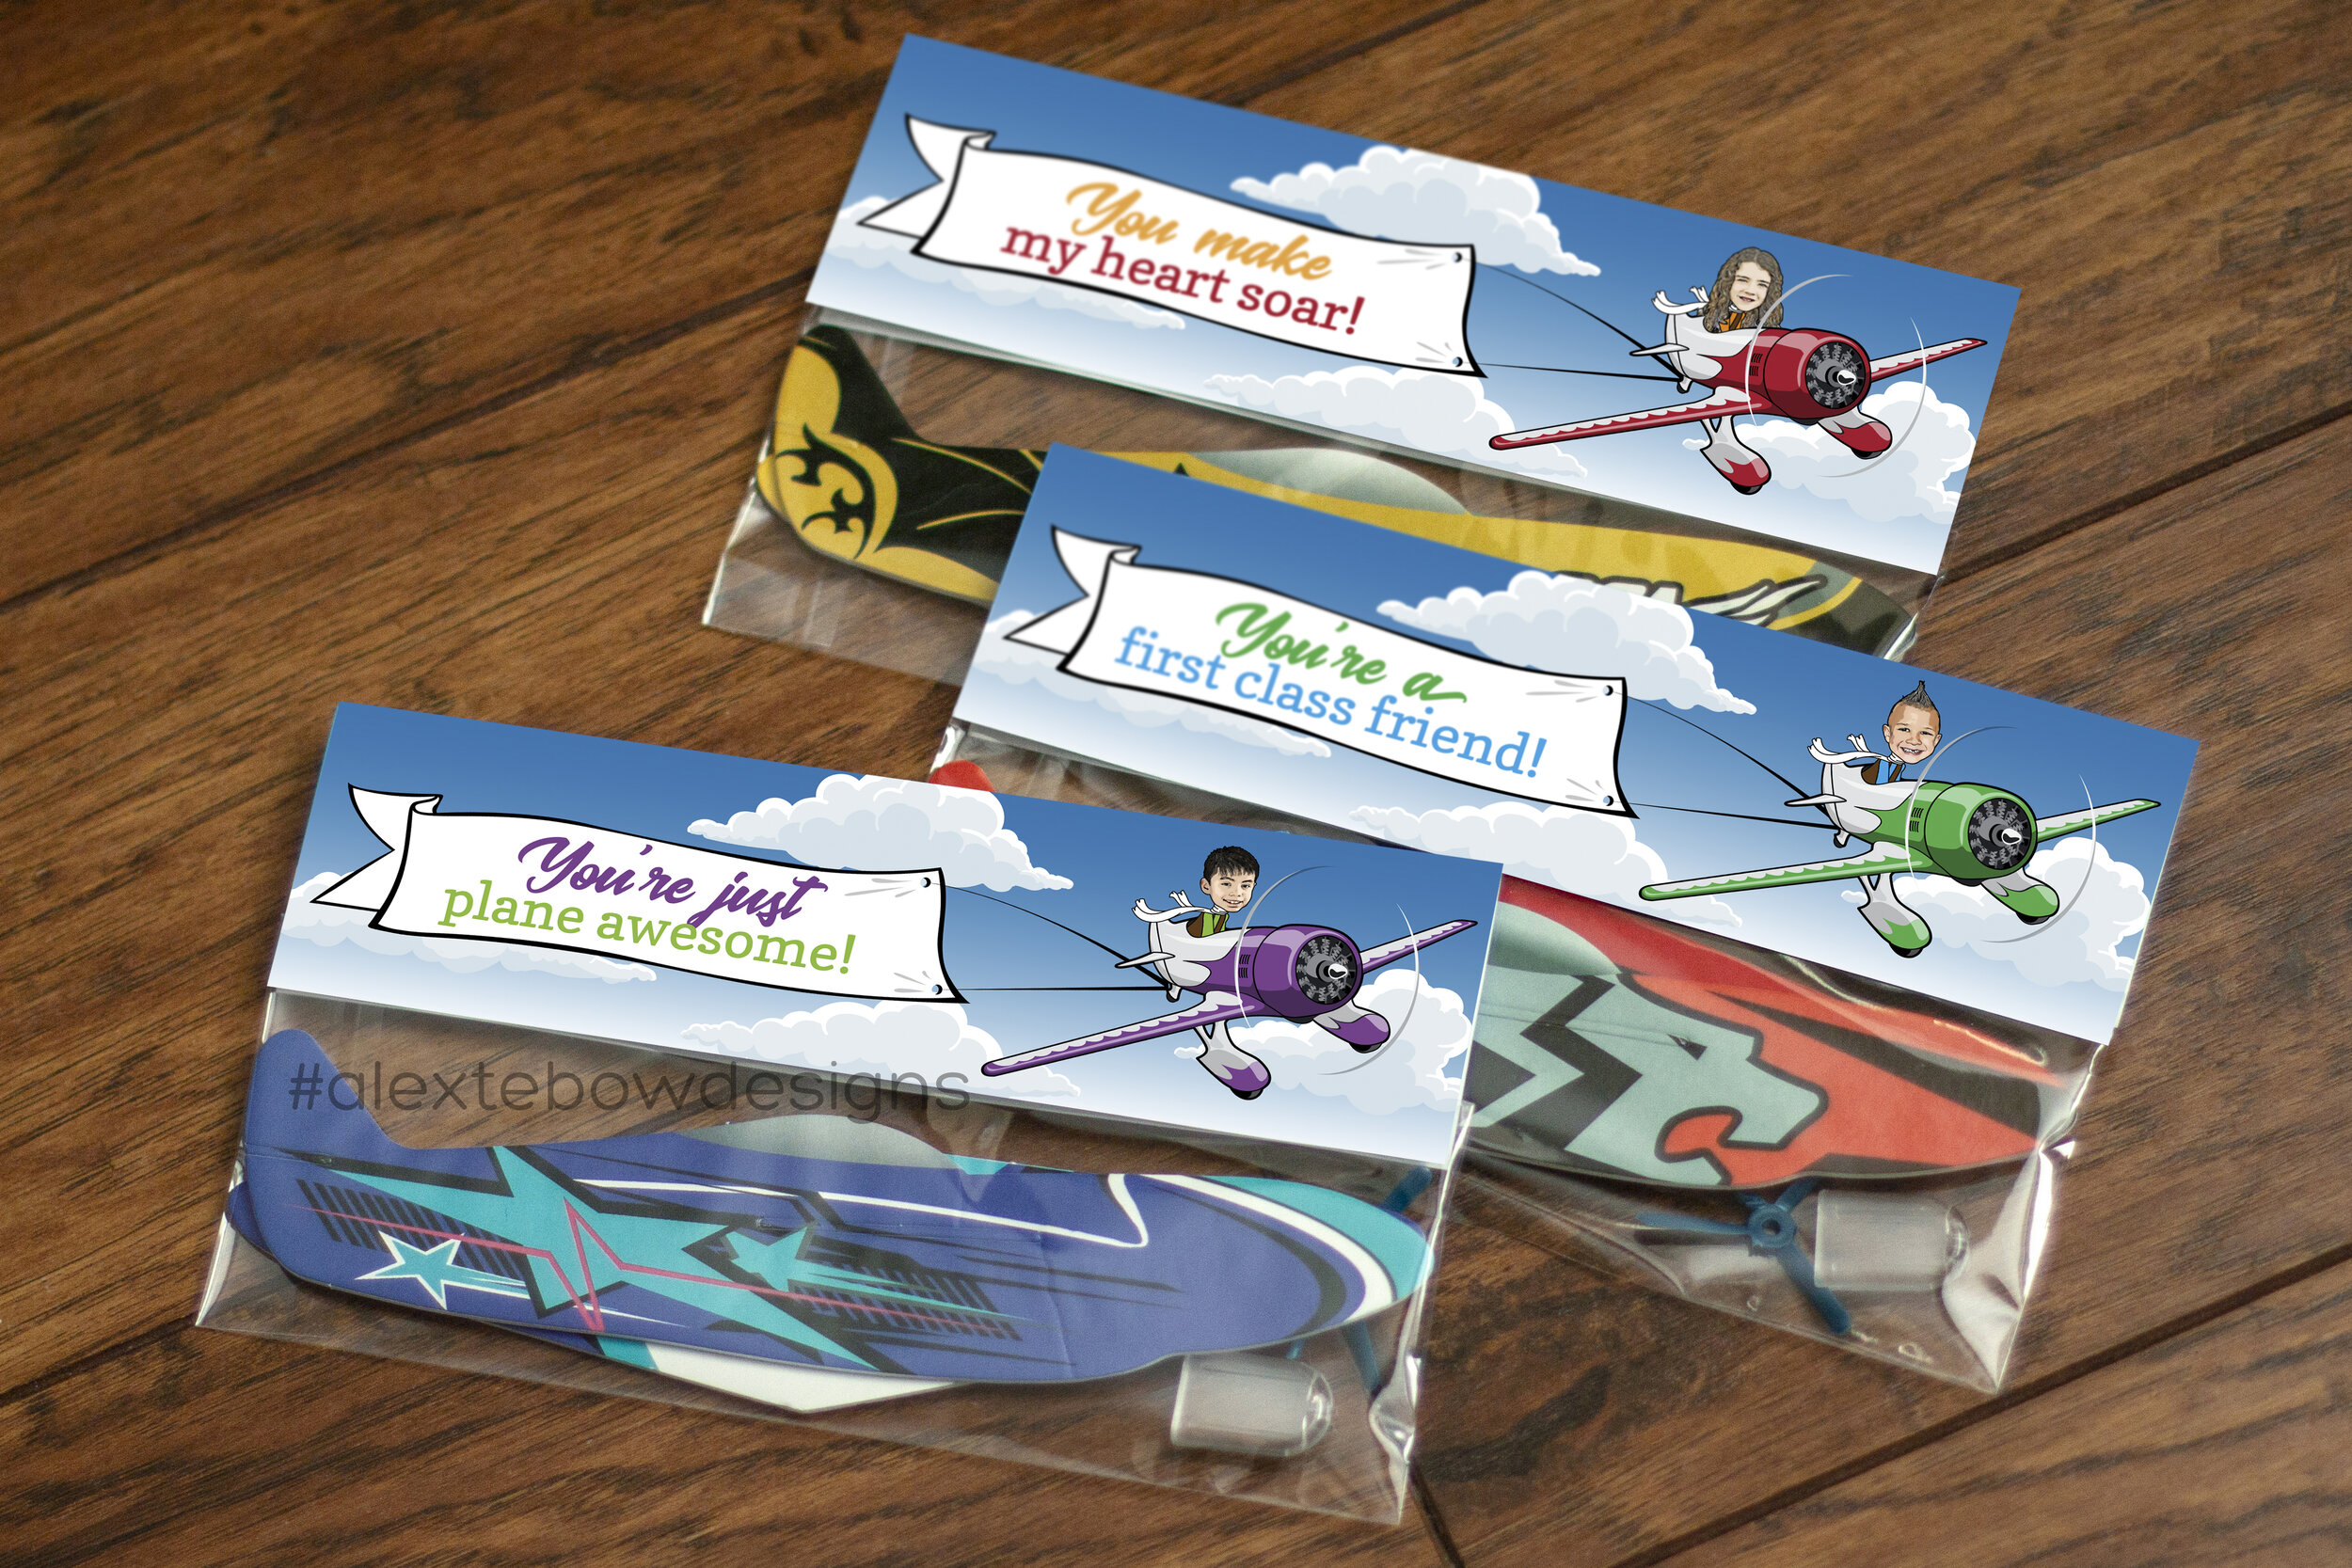
Airplane-themed valentines! These are about 8x2.5 inches after they’ve been folded in half. They are designed to be stapled to snack-size baggies filled with valentine treats. You can consider sending non-candy, non-food, and allergen-free valentines to school and order foam airplane kits like pictured. You can order them from Amazon here. Just staple to the top of the poly bags. These were a HUGE hit in my kids’ classes last year. I add their salutation to the back written in “clouds”.

Link to this listing

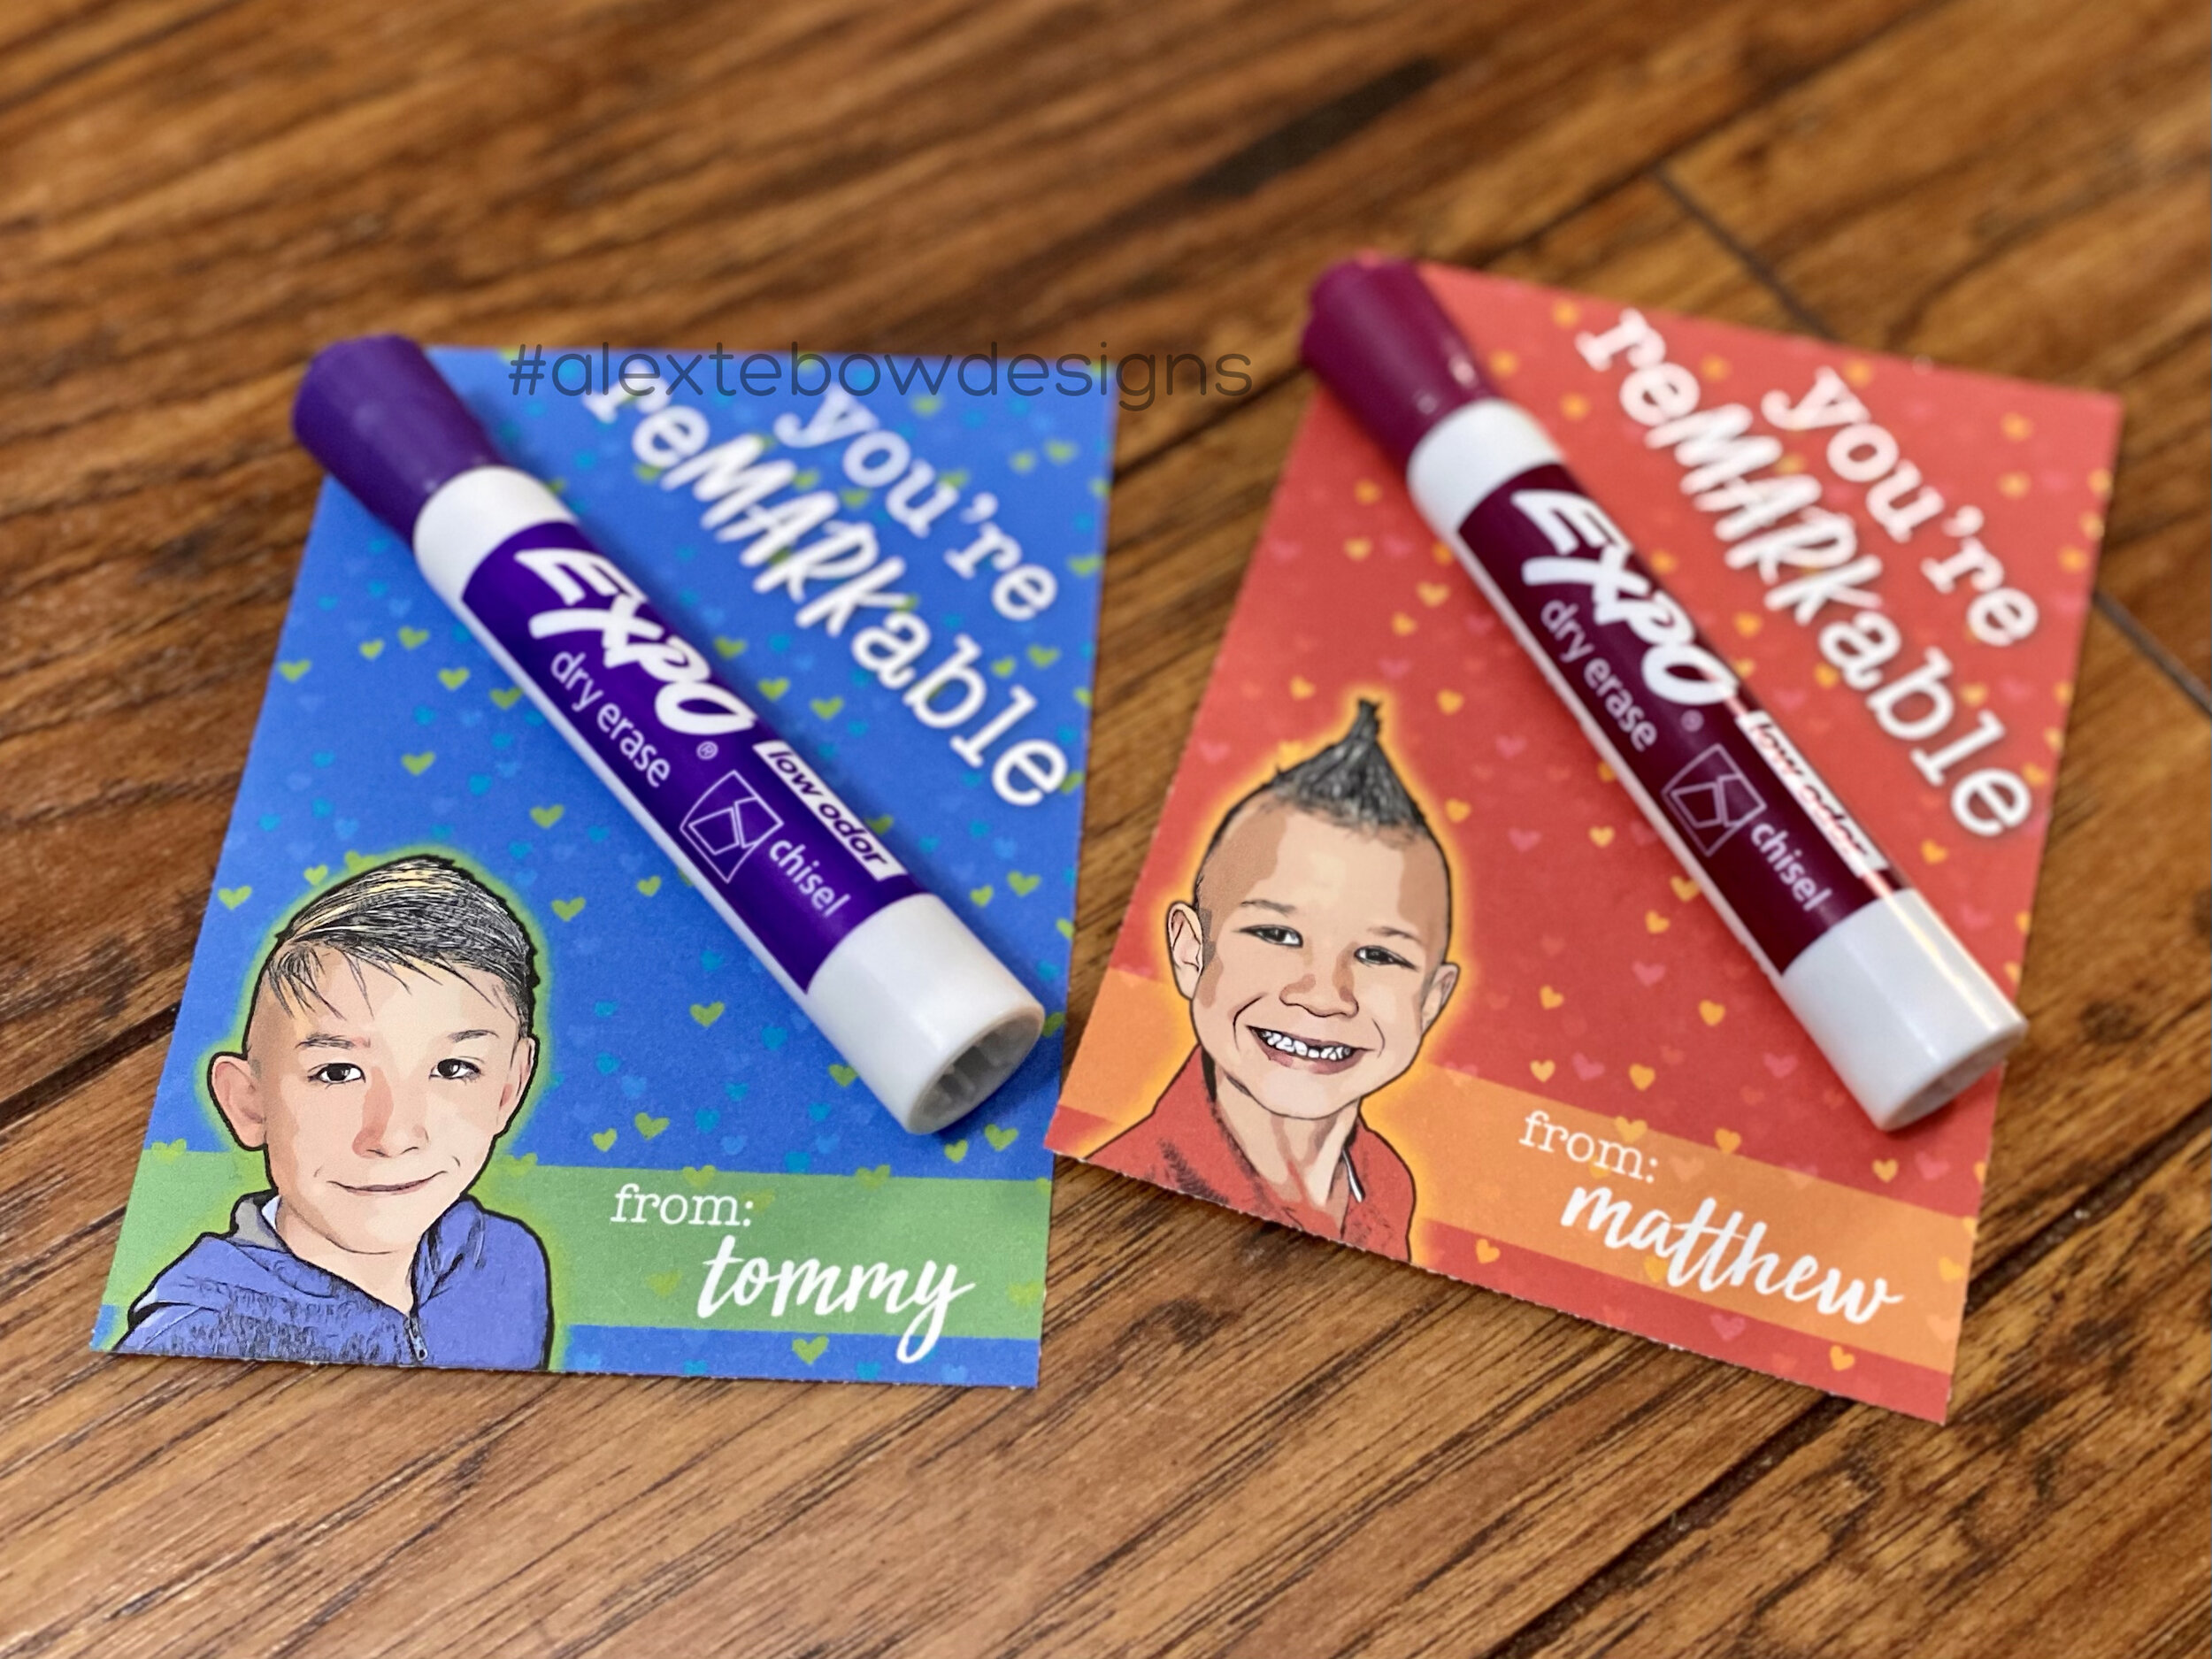
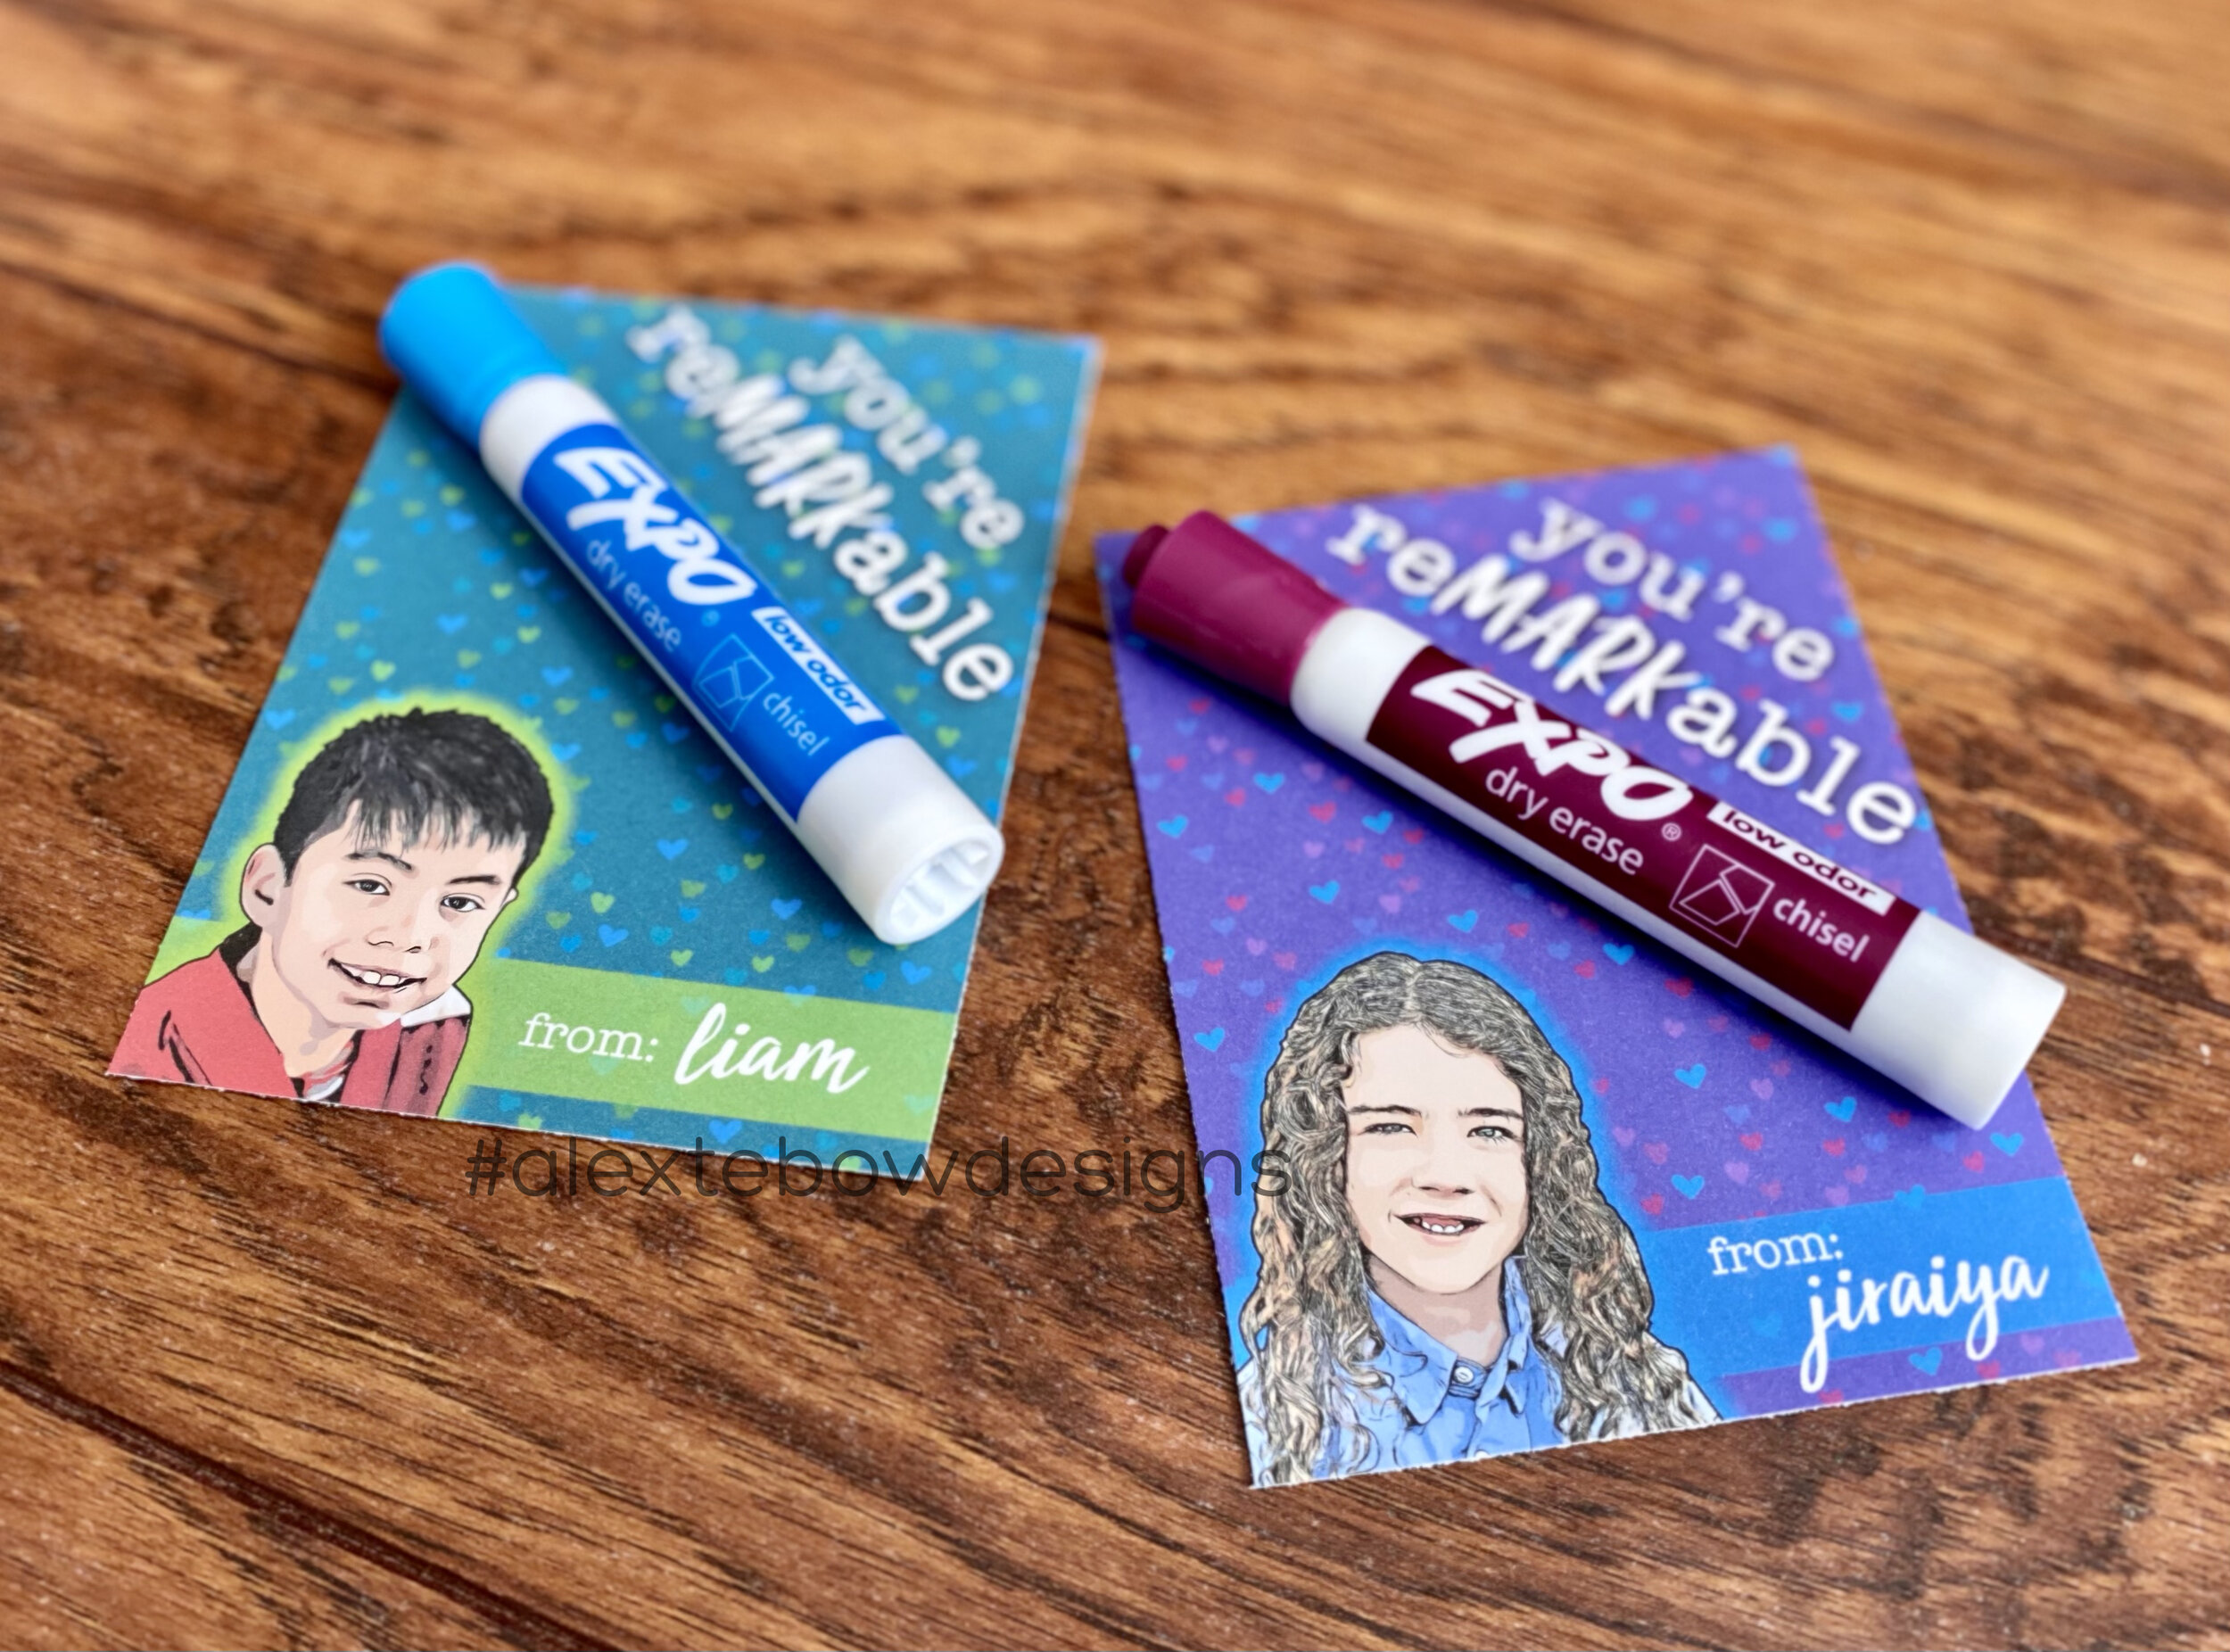
Expo Marker Valentines! These were our valentines for 2021. We opted to go non-edible again and gave each classmate a dry erase marker; which was a hot commodity that school year. For their teachers, they got a Ziplock back with 6 Expo markers and 4 Sharpies. The cards are set up 4 to a page and there is enough space to adhere a thick or thin dry erase marker to the card with double-stick tape or washi tape. Choose from four different color schemes. You can buy dry erase markers from Amazon or your local Costco or Sam’s Club.

Link to this listing

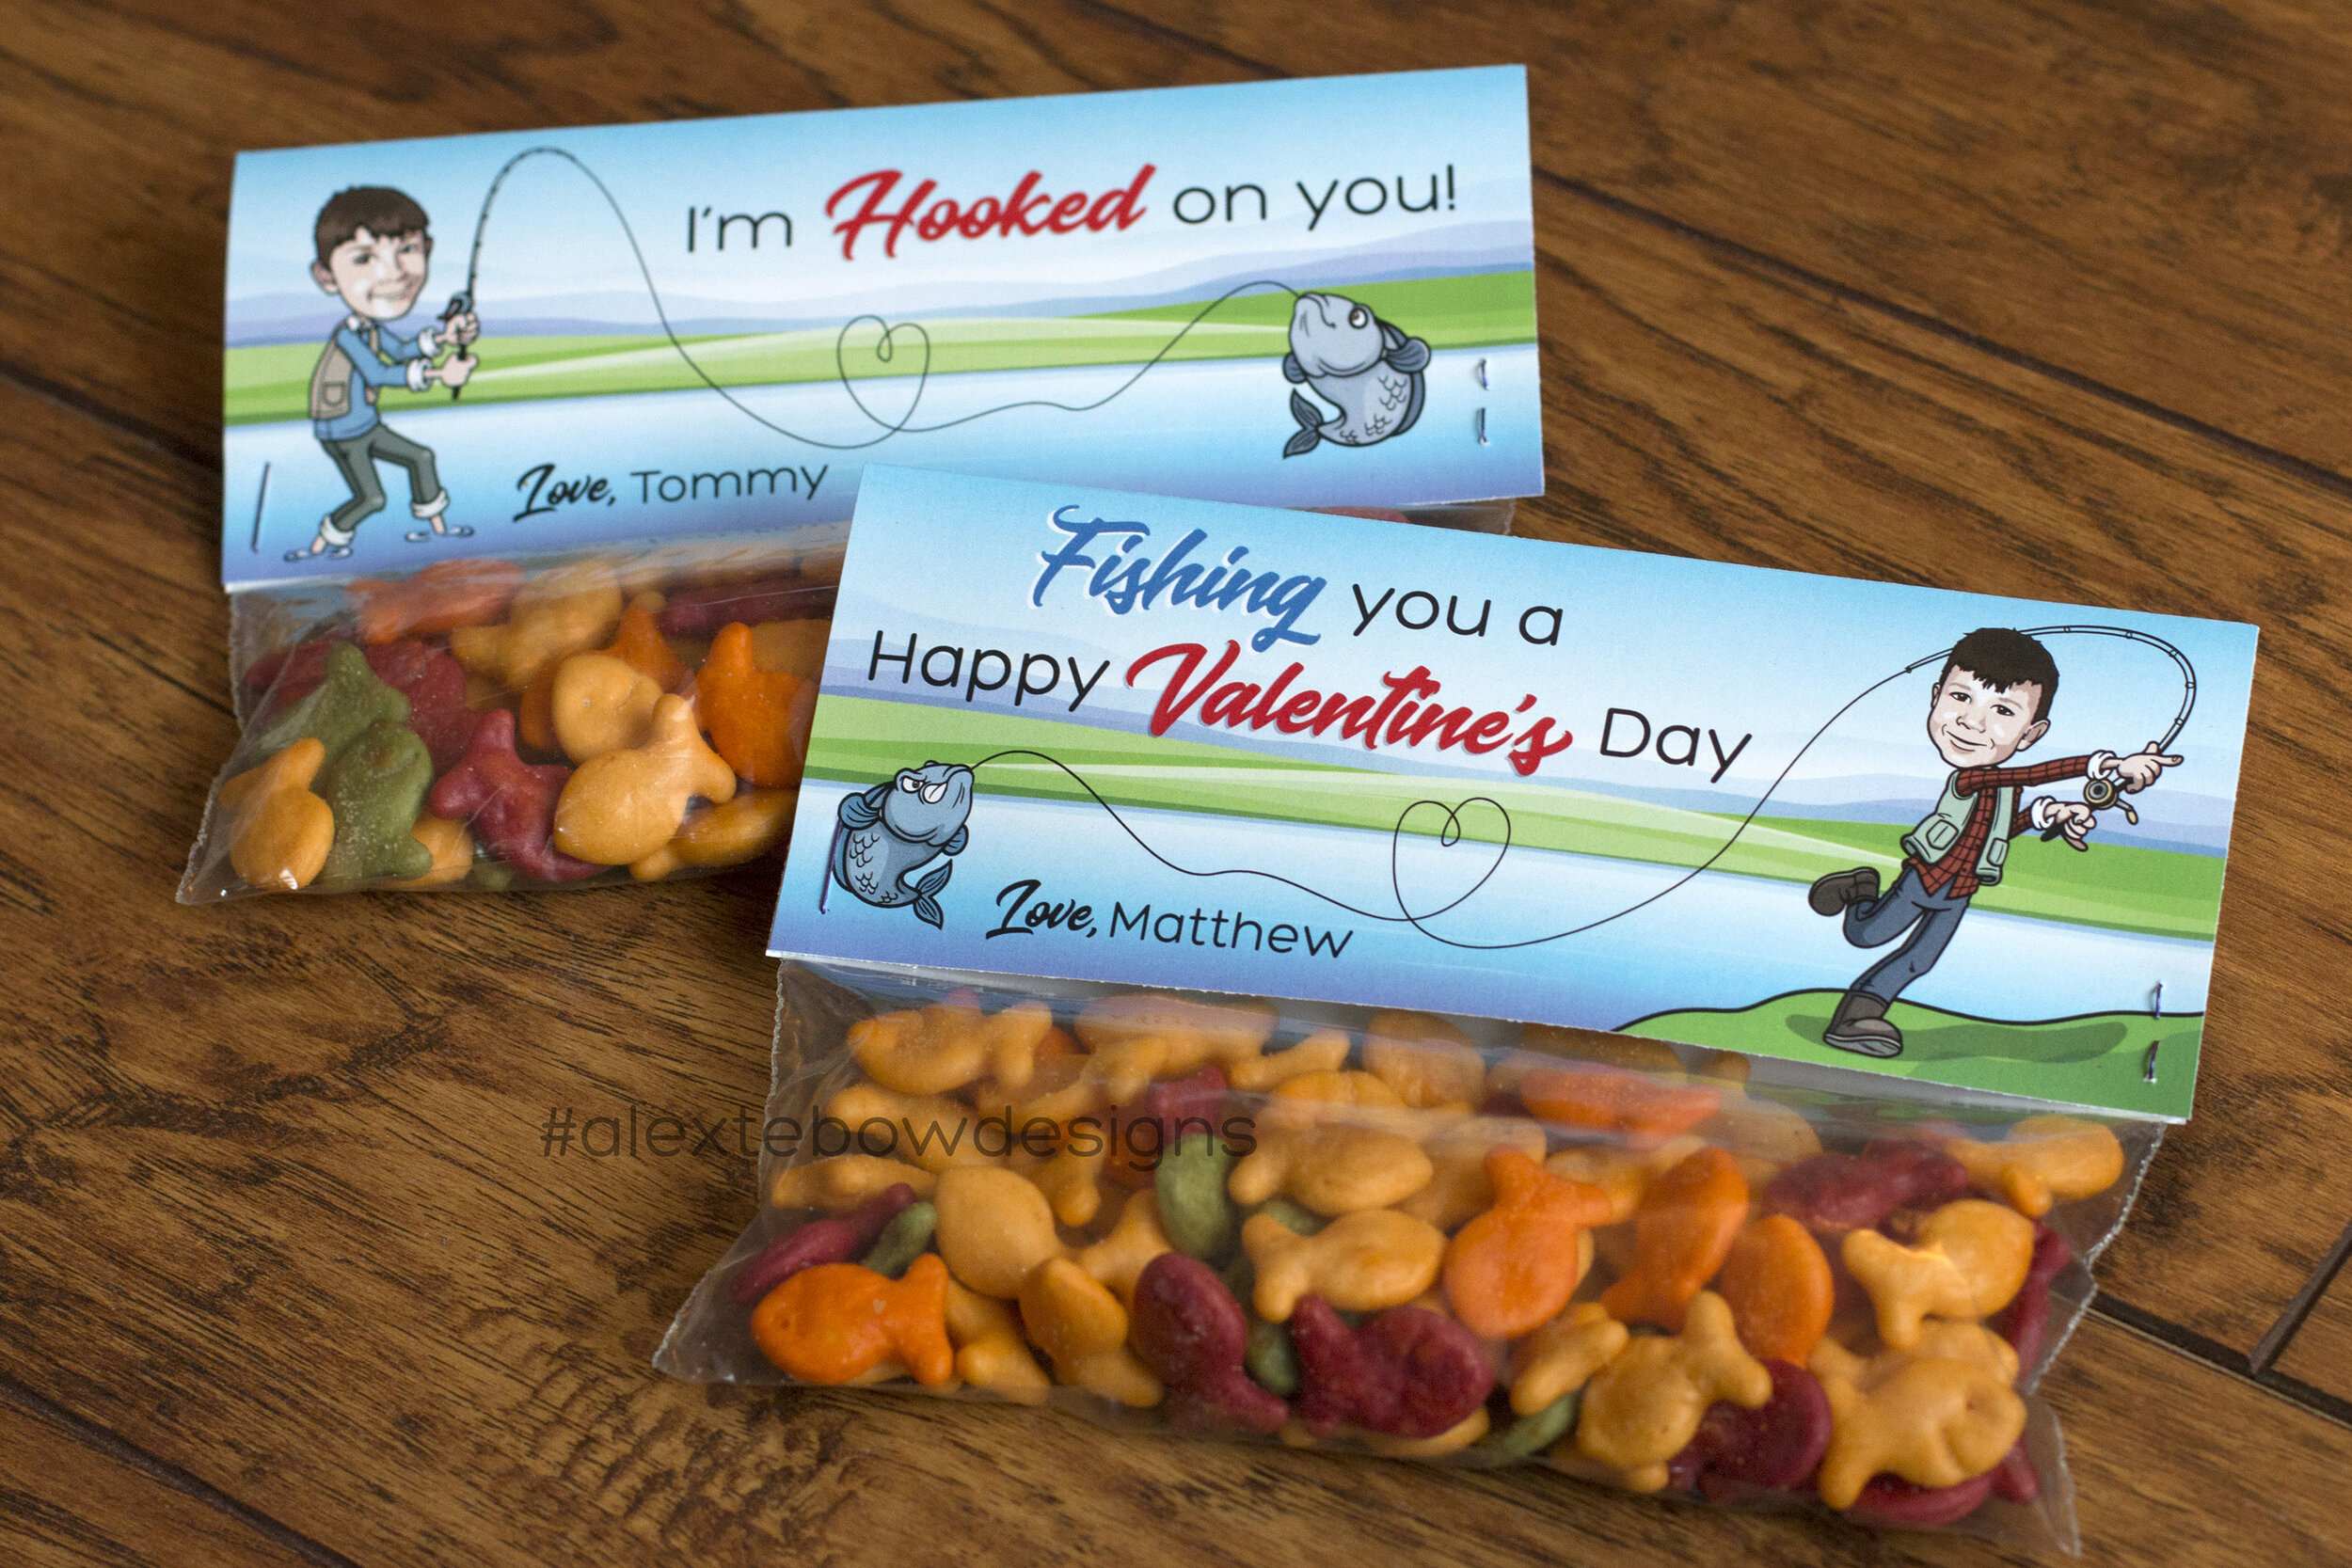
Fishing Themed Valentines! These were so much fun to create. My boys love fishing; my oldest especially. So it was only fitting to opt for a fishing-themed valentine. These are approximately 8x2.5 inches when folded in half. I turn your child into a fishing cartoon and after these are trimmed and folded in half, they can easily be stapled to a snack-size Ziplock bag. You can go sandwich-size if you’d like. Fill these with Goldfish crackers, Swedish fish, or maybe gummy worms.

Link to this listing

Fishing Valentines - Alex Tebow Designs

When I create new valentines, I’ll try to add them to my shop if they’re worth it. Happy Valentine’s Day!

DIY Bookmark

We're all going through such a unique time in our history and we're all doing our best to stay sane and safe. One thing my family has really ramped up while in quarantine is reading. My kids are spending more time reading (sometimes with a fight, sometimes without), and so have I. Even if that means I set up hammocks in the backyard to ensure extreme reading comfort when the weather is beautiful.

Alex Tebow Designs, DIY Bookmark

Please enjoy this printable DIY bookmark that I created for you and your kids. I designed it for the parenting website I co-founded that’s currently going through a redesign. I will share it there once I have it back up and running.

Most big kids will be able to do this by themselves. Younger kids may need a little help. My 10yo could do it all on his own, my 6yo needed a little help cutting out the teeth. Feel free to share on Instagram and tag me, @alextebowdesigns and also tell me what your favorite book is or what you’re currently reading.

Supplies needed:

  • A printer

  • Paper or card stock

  • Scissors

  • Glue stick

  • Favorite book

Step 1: Download and print the page with a color printer. Your bookmark will probably last longer if you can print on card stock, but use what you have. Photo paper will work too. Download the file here.

My 6yo and his smirk, hahahah

My 6yo and his smirk, hahahah

Step 2: Cut out a bookmark with scissors. My 6yo was able to cut this out by himself with a little help needed to cut out the teeth. 

Alex Tebow Designs, DIY Bookmark

Step 3: On one bookmark, fold the teeth triangle to the square’s center. Then fold the eyes triangle to the square’s center. 

Alex Tebow Designs, DIY Bookmark

Step 4:  Apply glue to the back of the eyes triangle and place it back over the teeth triangle. Let the glue dry. A simple glue stick worked great. Some white glue may take a longer to dry.

Alex Tebow Designs, DIY Bookmark

Step 5: Find a comfy place to sit with your favorite book and use your bookmark to save your spot. Or go sit in a book corner with your book corner! 

Alex Tebow Designs, DIY Bookmark

Feel free to share on Instagram and tag me @alextebowdesigns and tell me what your favorite book is right now. My 6yo says that Everyone Loves Bacon by Kelly DiPucchio is his current favorite. My 10.5yo’s favorite book right now is Major Impossible by Nathan Hale. I’m currently rereading The Dresden Files by Jim Butcher in anticipation of TWO new books coming out this summer.

What are you currently reading?

No-Sew Fleece Blanket; a Toy-Free Birthday Gift

IMG_0300.jpg

In the month of March this year, my kids were invited to five birthday parties. FIVE! Three of them were all in one weekend! In April they were invited to three. Two birthdays in July and then two again in August. Birthday kids varied in ages, from three all the way up to age nine. Some were close friends, some were school acquaintances. We didn’t have a ton to spend on these multiple birthday gifts and I have been striving to have less toys in our kids’ lives, so I somewhat vowed to myself not to buy toys as birthday gifts… which is a lot easier said than done, especially for younger kids.

Instead I decided to to make fleece blankets for the first month of birthdays and from then on, we were hooked. Depending on the age of the kid, we usually bought one and a half yards of no-pill fleece in two colors or patterns. The top layer is always a favorite character or some genre they’re into at the moment (Star Wars, Paw Patrol, Minecraft, or just unicorns, puppies, or a favorite sports team). There are LOADS of choices in fleece patterns. A quick text to a mom or dad helps us choose too. For the bottom layer, we chose a solid color that compliments the pattern. For the birthday kids who were turning nine, we got two full yards so they could have a slightly bigger blanket. With coupons, the fabric ends up costing between $20 and $30 per blanket. I’m sure if I planned ahead better, I could get an even better deal.

IMG_2023.jpg

For three of the birthdays, the pre-cut, no-sew fleece blanket kits that you can find at craft and fabric stores happened to be on sale for 40% or 50% off, so a few times we opted for those. They ended up being $15-$20 with sales or a coupon.

JoAnn’s is my first choice for fabric when it’s time to make a blanket. I choose not to shop at Hobby Lobby and we don’t have many other fabric stores where we live. Plus, JoAnn’s often has great deals through sales or coupons.

IMG_8237.jpg

Materials Needed:

  • 2 pieces of no-pill, polyester fleece, size is up to you. I like 1.5 to 2 yards for a great kid-sized throw. For an adult, I may opt for 3 yards.

  • 1 pair of very sharp scissors (I recommend having a pair ONLY for fabric. I have like 3, but you do you)

Step 1: Choose your fabric.

Step 2: Lay them out, stacked on top of each other and trim any edges so they’re the same size. If one or both of the fabrics are patterned, make sure the RIGHT sides are facing out.

Step 3: Cut a 4 inch square from all four corners. You can cut a piece of cardboard to use as a guide if you want, but I have always just eyeballed it based on the knowledge that my fabric scissors blades are about five inches long.

Step 4: Cut a 4 inch fringe along the sides, through both layers of fabric, all the way around the blanket. They should be about 1 inch wide and 4 inches long. Use your corner cuts as a guide. If you would prefer to use a ruler to make sure your cuts are precise, that’s totally up to you.

Step 5: There are lots of different ways to tie the ends. I usually take the stacked fringe pieces and tie a square knot, tying the two layers of fabric together. You can do a balloon knot like done here or once I did a braid-like tie like this (although I cut the fringe longer than they did). This video on YouTube shows four different ways you can tie off the fringe depending on what look you want. The choice is yours.

IMG_6518.jpg

Most importantly, my kids really love giving a gift that they helped make. Of course, now we need to think of something new to give if we’re invited to the same kids’ birthdays next year!

IMG_7201.jpg

Custom Mason Jar Labels

I love canning. My mom taught me how to make jam when I was a teenager and she learned how from her mom and her grandma. Growing up, we had a plum and an apricot tree in our backyard, so when June and July came around and the fruit was ripe, we'd hurry to pick the ripe fruit before it fell or the birds got to it. Then we'd spend an afternoon cleaning, pitting, crushing and stirring pots of molten sugar and fruit. The reward at the end of the day was the satisfying POP when the jars sealed and snacking on the leftovers. 

If you've never made jam before, it's fairly simple and lots of fancy tools aren't required. I didn't own a water bath canner until this year. I just processed jars in my big soup pot. I don't own a pressure canner either. I love this post and send it to anyone who's interesting in canning for the first time. It's a great place to get the basics. 

Half pint mason jars are my favorites to use, (both in standard and wide mouth, but in late summer, they sell out pretty quickly in my local stores, so I will order from Amazon, and save from having to drive from store to store hoping some are still in stock.

Every year my husband and I typically give whatever we canned as gifts to friends, coworkers and family, so the jars naturally NEED some sort of fun label. I created a couple of new ones this year and I added them to my Etsy shop for purchase.

Thanks to a local friend sharing the wealth of New Haven Peaches on her tree, I made a few batches of peach jam and peach vanilla butter. 

Then I created a few different versions of the label for whatever else someone may be canning. I have watercolor graphics of many, many different fruits and I'll adjust the background color to make sure there's a good contrast between it and the color of the fruit.

This next design I created was a blast to work on and definitely moves toward the non-traditional when it comes to canning labels.

So far I have created similar labels for strawberry and plum jams. I'll create a breakdancing fruit cartoon for whatever kind of jam you've made. 

This "That's My Jam" theme really only works with jam. Jellies, sauces, pickled items won't really work with this design. But I can always create something different with the same font and overall look, like I did for our "Twerkin' Vanilla Peach Buttah." If you'd like to do a custom label like this, just shoot me a message.

Lastly, this is the label design that I created last year. It's printing on what looks like faintly stripped kraft paper with a custom little fruit or vegetable cartoon.

These can be customized for pretty much anything that goes into jars. I can add a greeting to the bottom or not, totally up to you.

I can set these up to be printed on Avery labels, 22807 for standard sized jars or 22830 for wide mouth jars. If you'd prefer to not go with Avery labels, I can squeeze as many on a page as I can and you can print them onto full-sheet sticker paper and the use a circle punch. It's pretty easy.

Links for each label:
That's my Jam
Script & Watercolor
Kraft Paper Cartoons

As always, if you're interested in creating a custom label with fonts, color, verbiage, or anything that's different than these, don't hesitate to send me a message or email. Thanks!

*This post contains affiliate links. If you purchase an item through these links, I get a few cents and you're helping keep my website running. I appreciate it!